

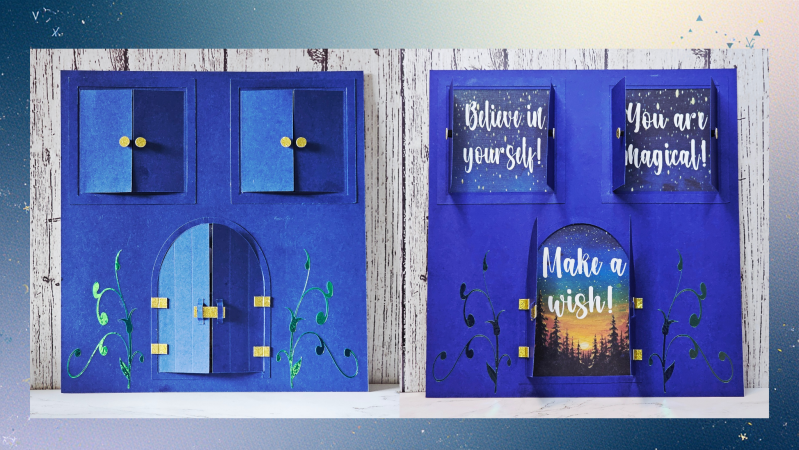
Some projects feel simple on the surface but carry a little spark of wonder the moment you open them. That’s exactly what inspired this interactive window card — a layered piece with two tiny windows and an arched double door that lift to reveal a starry‑night sky and encouraging messages underneath. I wanted to create something that could give encouragement to anyone who needs a reminder that there’s still a bit of magic waiting behind the next door they open.
If you’d like to make one too, here’s the full step‑by‑step tutorial. You can also watch the process in the TikTok video I’ve added to this post.
Supplies You’ll Need
- Cardstock for the front panel (blue or your chosen color)
- White cardstock for the backing square
- Print‑then‑cut starry‑night background with messages
- Gold glitter cardstock (for trim and door/window details)
- Color‑shifting chrome cardstock or vinyl (for vines)
- Adhesive (tape runner or liquid glue)
- Adhesive hanging tab (optional)
- Cutting machine (Cricut, Silhouette, etc.)
- Scoring tool or bone folder
Step 1: Cut the Window Panel
Start by cutting the main front panel that includes the two windows and the arched double door.
Make sure your score lines are set correctly so the flaps open smoothly when lifted.
Step 2: Print and Add Your Starry‑Night Message Layer
Print your starry‑night background with the messages already included using print‑then‑cut.
This single printed layer sits behind the windows and door so the galaxy and the words show through when each flap opens.
Flip your front panel over and adhere the printed layer to the back, making sure everything lines up with the openings.
Step 3: Add Trim and Decorative Details
Now it’s time to bring the front panel to life.
Add:
- Gold glitter trim around each window and door
- Gold “knobs” or handles
- Chrome color‑shifting vines for shimmer and dimension
These details give the piece its magical cottage feel.
Step 4: Cut and Add the Backing Square
Cut a plain white square the same size as your front panel.
This creates a clean, finished backing and hides all the layers inside.
Glue the decorated front panel onto the white backing square, making sure the edges line up neatly.
Step 5: Add the Adhesive Hanging Tab (Optional)
If you want your piece to hang:
- Measure the top center of the back panel
- Make a tiny pencil mark
- Place your adhesive hanging tab directly over that mark
- Press firmly
This turns your project into a display piece you can hang on a wall, pegboard, or hook.
Watch the Full Process
@sams.signature Made this reveal‑style door card — such a sweet idea for a friend. #PaperCraftsForFriends #PaperCraft #HandmadeGift #CraftTok #Cardmaking ♬ Fantasy in an Immersive World - Ernesto P. Neto
Final Thoughts
This project is simple, magical, and full of heart. Whether you’re making it to give someone a little encouragement or simply creating for the joy of it, this interactive window card is one of those pieces that feels special from start to finish. If you make your own version, I’d love to see how you customize it and make it your own.
Ad & Affiliate Link Disclaimer
Some posts on this blog contain affiliate links or advertising links. If you click through and make a purchase, I may earn a small commission at no additional cost to you. These commissions help support my creative work and the free resources I share with this community. I only recommend products and services I genuinely believe in and feel align with the heart of Sam’s Signature.
Add comment
Comments